Document Monitoring
The Document Monitor Page is a vital component of our product that provides users with real-time visibility into the status of documents entered in the document processing queue. This comprehensive documentation explains how the Document Monitor Page empowers users to track important document details, status, and any required user actions for efficient document processing.
Key Features of the Document Monitor Page
The Document Monitor Page encompasses the following key features:
Document Status Tracking: Users can track the status of documents as they progress through the document processing queue, providing real-time visibility into the document workflow.
Document Details: The page displays important document properties, including the document name, making it easy for users to identify specific documents.
Status Information: Users can view the current status of each document to understand its stage in the document processing workflow.
User Action Notifications: The page highlights any action required by the user for specific documents, ensuring prompt attention and resolution.
Note:
If you encounter any issues, contact your system administrator.
Accessing Document Monitor
To access the Document Monitor page, follow these steps:
-
In the main menu, under Document Monitoring, click Document Monitor. The Document Monitor page opens.

-
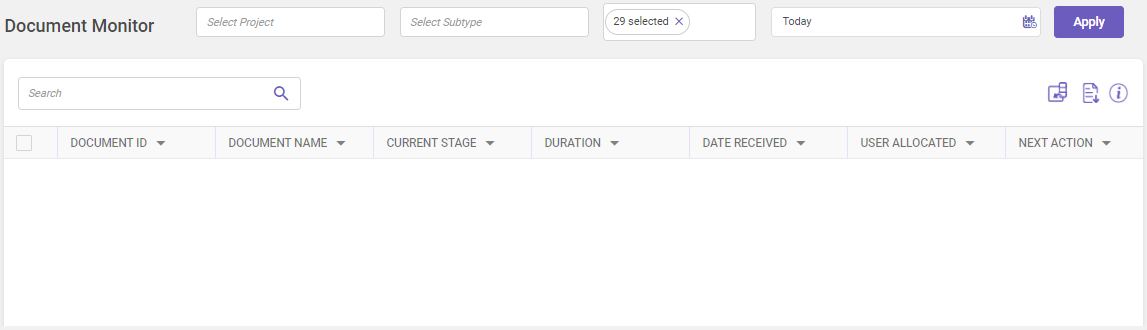
Select the required options as mentioned below
-
Project: Select a single project or multiple projects from the drop-down list.
-
Subtype: Select a single subtype or multiple subtypes from the drop-down list. The drop-down will display the subtypes associated with the selected project.
-
Current Status: Upon page load, all current status options in the drop-down will be preselected. To narrow down your search and view documents relevant to a particular stage, simply choose the desired options while deselecting any unnecessary ones. This will ensure that the grid presents records that precisely align with your selected criteria.
Below drop-down provides instructions for various scenarios regarding document display preferences.
 Document records display preferences
Below table provides instructions for various scenarios regarding document display preferences when you select options from the Current Status drop-down.
SCENARIO
SELECTION OPTION
ACTION
View downloaded documents Downloaded
-
Uncheck other options to only view downloaded documents.
-
Uncheck the Downloaded option only to hide downloaded documents.
View ready for preprocessed documents Ready for Preprocessed
-
Uncheck other options to only view documents ready for preprocessing.
-
Uncheck the Ready for Preprocessed option only to hide documents ready for preprocessing.
View multiple objects identified documents Multiple Objects Identified
-
Uncheck other options to only view documents in which multiple objects are identified.
-
Uncheck the Multiple Objects Identified option only to hide documents in which multiple objects are identified.
View preprocessed documents Preprocessed
-
Uncheck other options to only view the preprocessed documents.
-
Uncheck the Preprocessed option only to hide the preprocessed documents.
View OCRed documents OCRed
-
Uncheck other options to only view the documents in OCR processing.
-
Uncheck the OCRed option only to hide the documents in OCR processing.
View doc identified documents Doc Identified
-
Uncheck other options to only view the documents whose document type is identified.
-
Uncheck the Doc Identified option only to hide the documents whose document type is identified.
View extraction completed documents Extracted
-
Uncheck other options to only view the extraction completed documents.
-
Uncheck the Extracted option only to hide the extraction completed documents.
View documents in MI and QC stage Failed
-
Uncheck other options to only view documents in MI and QC stage.
-
Uncheck the Failed option only to hide documents in MI and QC stage.
View ready for quality check documents and documents at Ready to Export Stage Completed
-
Uncheck other options to only view the documents ready for quality check and ready to export.
-
Uncheck the Completed option only to hide the documents ready for quality check and ready to export.
View documents at Ready to Export stage Completed with QC
-
Uncheck other options to only view documents at ready to export stage.
-
Uncheck the Completed with QC option only to hide documents at ready to export stage.
View documents at Ready to Export stage Completed with Veto
-
Uncheck other options to only view documents at ready to export stage.
-
Uncheck the Completed with Veto option only to hide documents at ready to export stage.
View rejected documents Rejected
-
Uncheck other options to only view rejected documents.
-
Uncheck the Rejected option only to hide rejected documents.
View ready for quality check documents Pending with Veto
-
Uncheck other options to only view documents ready for quality check.
-
Uncheck the Pending with Veto option only to hide documents ready for quality check.
View documents awaiting QC Awaiting QC
-
Uncheck other options to only view documents ready for quality check.
-
Uncheck the Awaiting QC option only to hide documents ready for quality check.
View exported documents Exported
-
Uncheck other options to only view exported documents.
-
Uncheck the Exported option only to hide exported documents.
View documents at Ready to Export stage Awaiting Export
-
Uncheck other options to only view documents at ready to export stage.
-
Uncheck the Awaiting Export option only to hide documents at ready to export stage.
View source identified documents Source Identification
-
Uncheck other options to only view source identified documents.
-
Uncheck the Source Identification option only to hide source identified documents.
View logo identified documents Logo Identification
-
Uncheck other options to only view logo identified documents.
-
Uncheck the Logo Identification option only to hide logo identified documents.
View receipts identified documents Identify Receipts
-
Uncheck other options to only view receipts identified documents.
-
Uncheck the Identify Receipts option only to hide receipts identified documents.
View QR/Barcode identified documents QR/Bar Code Identified
-
Uncheck other options to only view barcodes identified documents.
-
Uncheck the QR/Bar Code Identified option only to hide barcodes identified documents.
View UWUC identified documents UWUC Identified
-
Uncheck other options to only view UWUC identified documents.
-
Uncheck the UWUC Identified option only to hide UWUC identified documents.
View documents awaiting manual split Awaiting Manual Split
-
Uncheck other options to only view documents awaiting manual split.
-
Uncheck the Awaiting Manual Split option only to hide documents awaiting manual split.
View auto split completed documents Auto Split
-
Uncheck other options to only view auto split completed documents.
-
Uncheck the Auto Split option only to hide auto split completed documents.
View manual split completed documents Completed with Manual Split
-
Uncheck other options to only view manual split completed documents.
-
Uncheck the Completed with Manual Split option only to hide manual split completed documents.
View shadow removed documents Shadow Removed
-
Uncheck other options to only view shadow removed documents.
-
Uncheck the Shadow Removed option only to hide shadow removed documents.
View split discarded documents Split Discard
-
Uncheck other options to only view split discarded documents.
-
Uncheck the Split Discard option only to hide split discarded documents.
View discarded documents Discarded
-
Uncheck other options to only view discarded documents.
-
Uncheck the Discarded option only to hide discarded documents.
View export file created documents File Created
-
Uncheck other options to only view export file created documents.
-
Uncheck the File Created option only to hide export file created documents.
View documents with ML extracted data ML Extraction
-
Uncheck other options to only view documents with ML extracted data.
-
Uncheck the ML Extraction option only to hide documents with ML extracted data.
View pre-process initialization completed documents Preprocess Init
-
Uncheck other options to only view pre-process initialization completed documents.
-
Uncheck the Preprocess Init option only to hide pre-process initialization completed documents.
View object identified documents ML Service Pre
-
Uncheck other options to only view object identified documents.
-
Uncheck the ML Service Pre option only to hide object identified documents.
View documents with extracted data ML Service Post
-
Uncheck other options to only view documents with extracted data.
-
Uncheck the ML Service Post option only to hide documents with extracted data.
View documents with integrated validation in progress Inter Document Validation
-
Uncheck other options to only view documents with integrated validation in progress.
-
Uncheck the Inter Document Validation option only to hide documents with integrated validation in progress.
View documents at Ready to Export stage -
Completed
-
Completed with QC
-
Completed with Veto
-
Awaiting Export
-
Completed with manual split
-
Uncheck other options to only view documents at Ready to Export stage.
-
Uncheck the options mentioned in 2nd column only to hide documents at Ready to Export stage.
You can view the records for a pre-defined duration or use the
 icon to specify the required duration and then click Apply. All records matching the given criteria are displayed in the grid.
-
Following activities can be done on Document Monitor page once records are displayed.
-
Utilize the Search field to filter and find specific records within the displayed grid (Refer searching data).
-
Click the column chooser icon
 to manage the display of columns. You can check/uncheck the columns you want to include or exclude from the Document Monitor page.
-
Click
 to export all the document records in excel format. The exported data includes all displayed rows and columns except for the Next Action column.
-
Click
 to view the column descriptions.

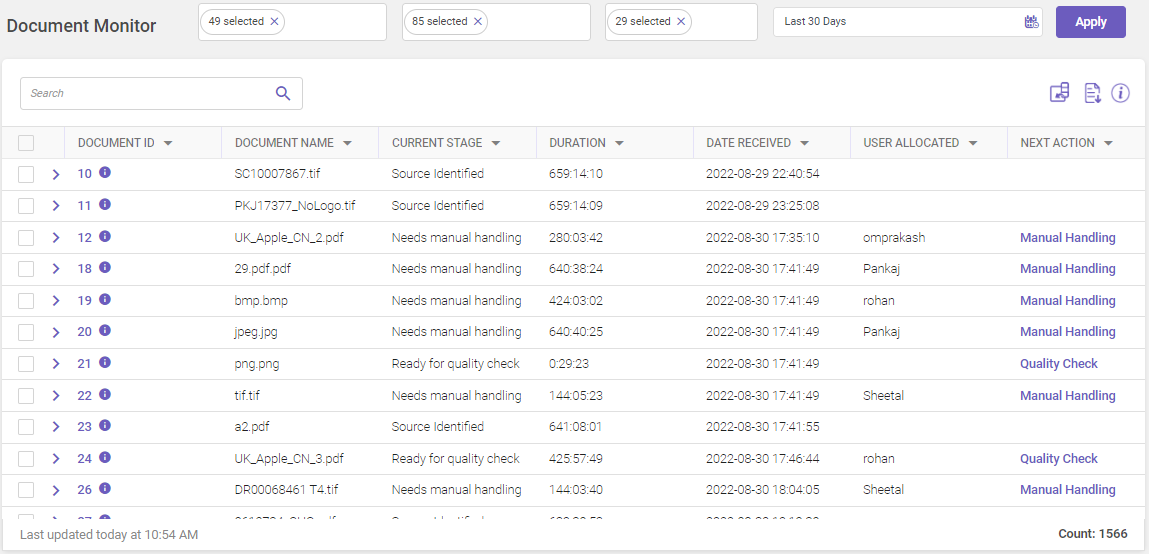
Refer to the table for column header descriptions.
|
COLUMN NAME |
DESCRIPTION |
|---|---|
|
Document ID |
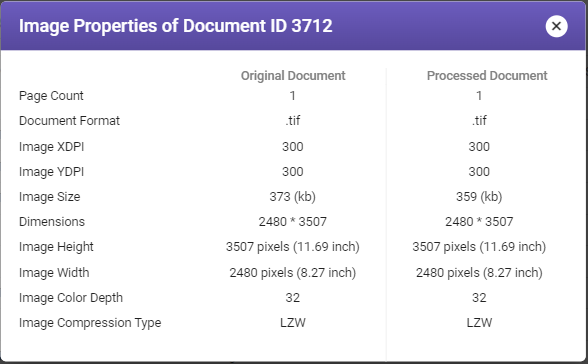
Displays the unique identification for the document in the system. You can also click on the information
|
|
Category |
Displays the category name. Note Using the column chooser |
|
Project |
Displays the project name. Note Using the column chooser |
|
Subtype |
Displays the subtype name. Note Using the column chooser |
|
Batch Name |
Displays the batch name. Note Using the column chooser |
|
Document Name |
Displays the name of the file associated with document id. Note In case of split documents the split documents will be renamed as parentdocumentname/number+n (where n = number of split pair). Refer splitting and merging. |
|
Parent ID |
Displays the parent from which the following document has been split. Note Using the column chooser |
|
Displays the current stage of the document in the document processing cycle. (Click link to see the available stages.) |
|
|
Duration |
Displays the document processing time taken to reach the current stage in (HHH:MM:SS) format. Note
|
|
Date Received |
Date on which the document was received for processing. |
|
Prioritized |
Yes, if it is to be taken on priority in respect to the other documents; otherwise No. Note Using the column chooser |
|
User Allocated |
Name of the user allocated to process the document. |
|
Displays the readability score of the document post OCR stage is completed. For rejected documents the readability score is displayed as NA. In case of multiple OCR engines, the score from the most accurate OCR engine is considered and displayed on the column. To configure the readability score as a part of export, select the output field type checkbox and the output field format as Default while adding the output location. Note Using the column chooser |
|
|
Awaited action on part of the user, if any. A document may be awaited for manual inspection, quality check, for data export or to view the exported or ready to export data. NOTE Note
|
 icon next to the document Id to view the original and processed document properties. (See image below.)
-
Expand the document row by clicking
 icon, the details specific to the document are displayed as shown below.

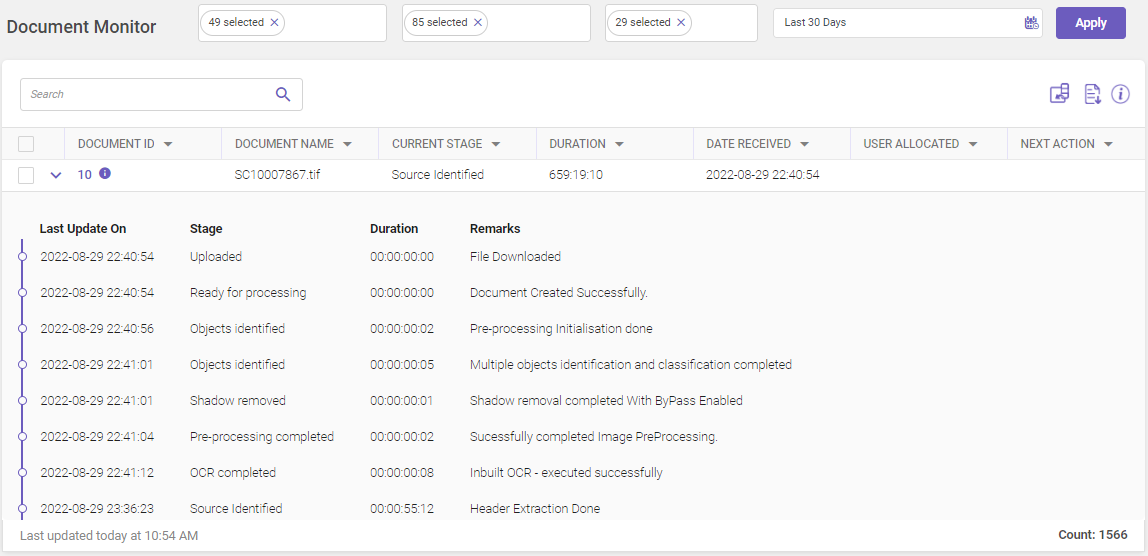
Once the documents are uploaded for processing, the documents are processed based on the accuracy and the stages involved. Apart from the regular process, it is possible if the user wants to prioritize any specific document for processing.
To set priority, follow these steps:
-
From the main menu, access the Document Monitoringpage. Select the project, subtype, and current status (or multiple projects, subtypes, and current status) from the drop-down to view the records.
Note:
If the Prioritized column is not visible, then select it from the column chooser
icon to view the Prioritized column on the document monitor page. -
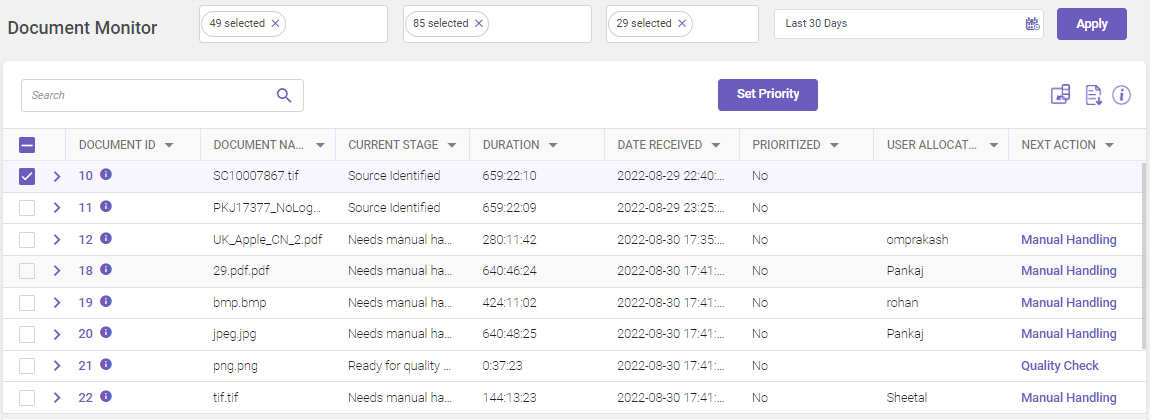
Select the required document ID checkbox for whom you want to set priority. When you select the checkbox, a Set Priority button is visible as shown below.

-
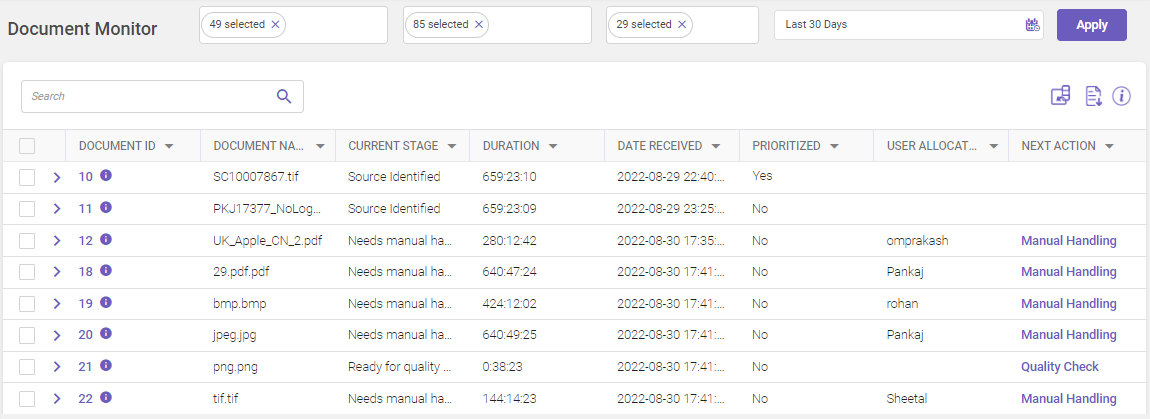
Click Set Priority, the priority for the selected document ID changes to Yes under Prioritized column as shown below.

Note:
The document monitor setting enables the user to set the refresh rate at which the documents get refreshed on the document monitor page.
NEXT
Now that you know the status of the document, let's see how to manually process a document.
Useful links
Integrated documents processing
User productivity detailed report